Mastering CyberArk EPM: Implementation Guide

When looking for Endpoint Privilege Management (EPM) solutions, there are not a lot of options out there. The main market players are CyberArk, BeyondTrust, Delinea (previously Thycotic) and the Microsoft Intune Endpoint Privilege Management. The best solution may differ based on the operating systems, organization size, industry, and whether the company has many developers needing admin access. These factors can also affect the implementation difficulty.
What is an EPM software?
An EPM software allows you to remove local admin rights on end-user devices and control which applications can be run as standard user, with elevated privileges/as admin or should be blocked. Eventually, it may embeds a few other features like credentials rotation enforcement, credential thefts protection, file system and registry access management, etc.
The two main motivations behind are to reduce the attack surface by removing local admin rights and enforce least privilege.
1. Configure Access to the EPM Admin Console
The first step is to secure and ease the access to the EPM Admin Console.
For this you can configure authentication via SAML from your Identity Provider, enforce SSO for all users beside admin account to access the login URL as a break glass account.
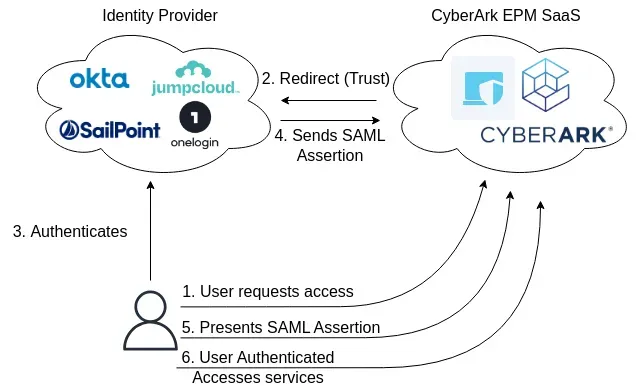
You will need to configure the SAML authentication on both Identity Provider and Service Provider sides, with their respective certificates and properties.

Once the SAML authentication is set up, the next step is to implement role-based access control within the EPM admin console. In the screenshot below, you'll see how you can configure various roles with distinct sets of permissions. For instance, you might have roles designated for system administrators, helpdesk personnel, and security auditors.
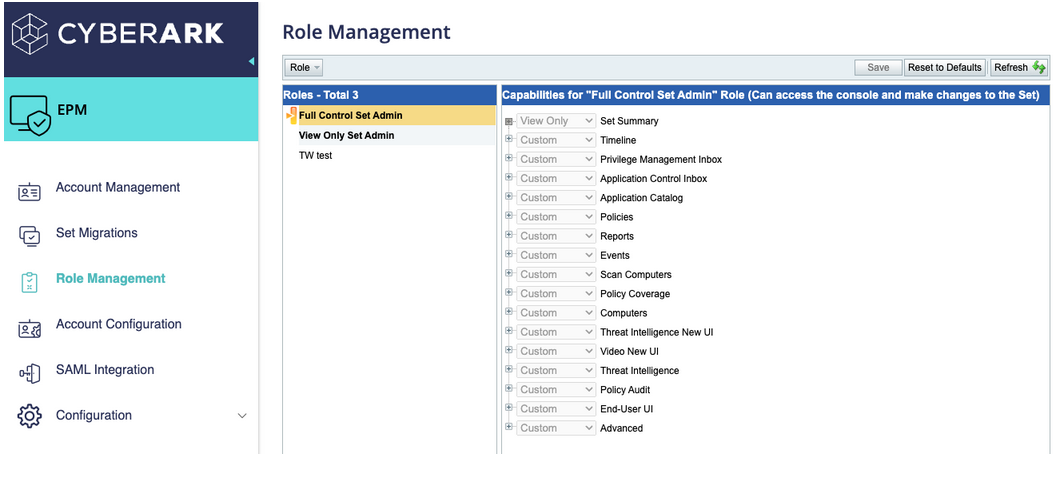
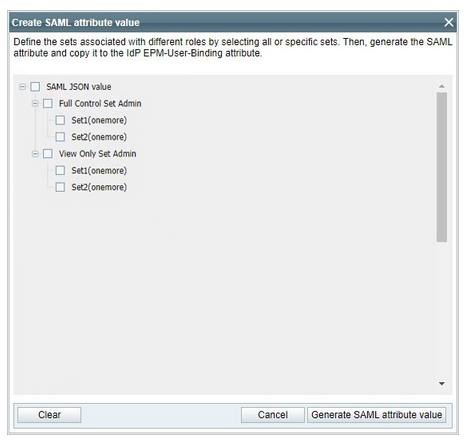
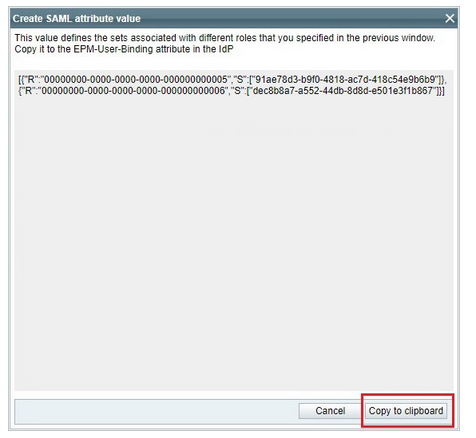
To link these roles with SAML integration, you'll need to generate EPM-User-Binding attribute values for each role you want to assign. On the identity provider (IDP), different user groups will be associated with the CyberArk Admin Console SSO App. Each of these user groups will be assigned a specific EPM-User-Binding attribute value that you've previously generated. This ensures that users within each group are assigned the appropriate role within the EPM admin console.
2. Prepare the EPM agent Deployment
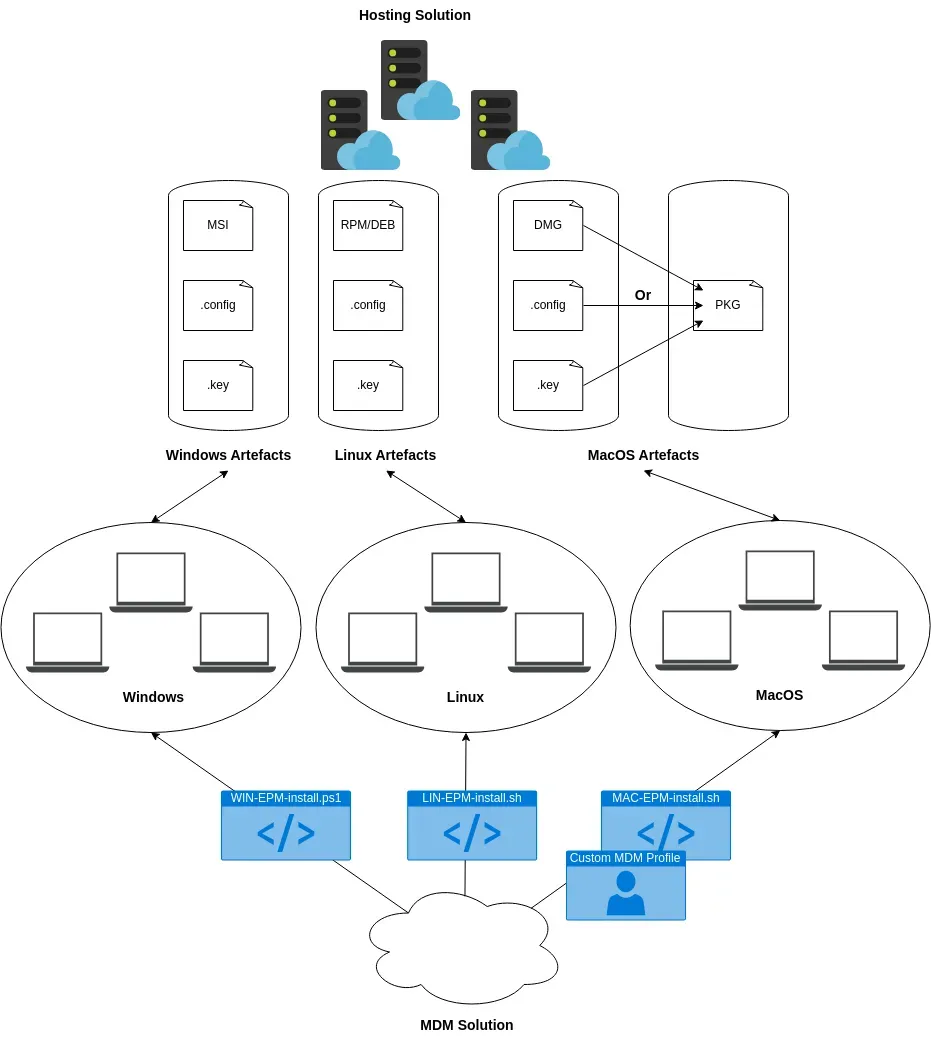
The second step is to prepare the installation of the EPM agent on your fleet of devices through your device management solution, the installation should be seamless in terms of user experience and the installation needs to be automated.
Windows
When downloading the agent for Windows from the EPM admin console via My Computers > Download Center, you'll receive an MSI installer along with configuration and key files. No additional packaging is necessary for deployment on Windows systems.
MsiExec.exe /i "<Agent msi file>" SECURE_TOKEN="<token>" INSTALLATIONKEY="key" CONFIGURATION="<configuration file>" /qn
MacOS
On MacOS devices, you have two deployment options. You can either distribute the agent as a DMG file along with configuration and key files, or package it as a PKG file embedding the configuration and installation key. Additionally, deploying on MacOS requires pushing a Mobile Device Management (MDM) custom policy to your MacOS fleet. This custom policy should include the appropriate mobile configuration settings to allow system extension and network extension. This ensures a seamless deployment process for users without requiring any manual actions. Without the custom MDM policy, users might inadvertently dismiss notification prompts, leading to faulty agent installations on their devices.
To install with DMG, configuration, and key files:
$ sudo "<path to CyberArkEPMInstaller>" [-adminUser "<administrator user name>"] [-adminPassword "<administrator password>"] [-token "<token>"] [-installationKey "<installation key>"] [-configuration "<configuration file>"] [-withoutNetworkExtension]
To install with PKG:
installer -pkg <path_to_pkg>/<pkg_name>.pkg -target /
Linux
Similarly, for Linux systems, when downloading the agent from the EPM admin console via My Computers > Download Center, you'll receive the appropriate package format RPM or DEB along with configuration settings and a unique key. No additional packaging is required for deployment on Linux systems.
<yum|apt-get> install ./epm-ubuntu.x86_64.deb && /opt/cyberark/epm/bin/epmcli --activate [-c <path_to_config_file>] [-k |-k <installation_key> |-f <path_to_installation_key_file>]
3. Plan your organization architecture
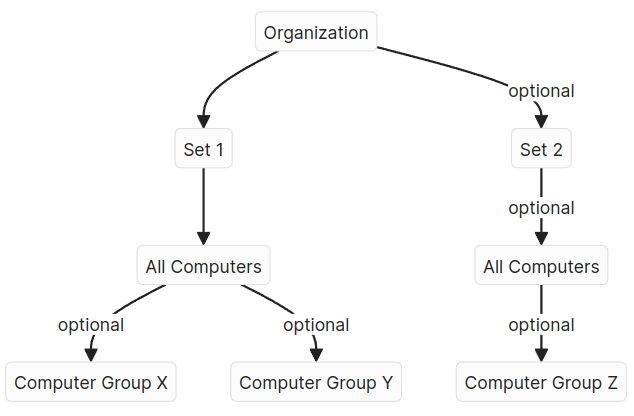
Planning your architecture ahead of time is crucial. The structure you choose will dictate how you manage different groups of computers and policies. Although migrating computers between sets is possible, it’s more efficient to anticipate organizational changes and start with an architecture that best fits your needs from the beginning.
To determine the most suitable architecture for your organization, consider whether you want all your EPM agents in a single set or if separate sets with distinct policies are necessary. If you have an Active Directory (AD) for integration, a single set might suffice. Without AD, separate sets with their own policies might be necessary to manage different computer and user groups effectively. For example, you might have distinct policies for technical and non-technical employees.
Organization, Sets and Computer Groups
Mono-set Architecture
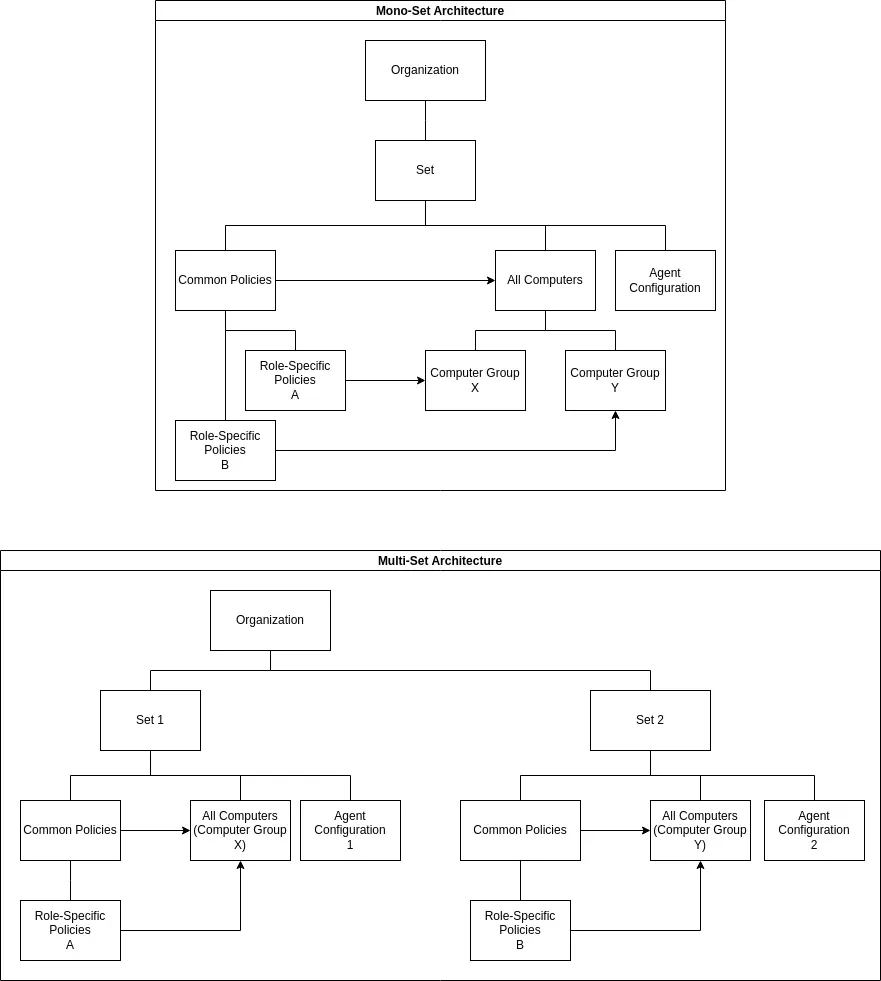
A mono-set architecture centralizes policies and agent configurations, simplifying management. This setup is particularly effective if you can integrate with Active Directory, as it allows for streamlined policy application across the organization.
Pros:
- Centralized management
- Simplified policy and agent configuration
- Effective integration with Active Directory
Cons:
- May become complex if not using Active Directory
- Less flexibility
Multi-set Architecture
A multi-set architecture, on the other hand, provides more flexibility but at the cost of increased complexity. This setup is beneficial if you need role-specific policies and cannot rely on Active Directory for integration. Each set operates independently, allowing for tailored policies and configurations for different groups.
Pros:
- More Customization
- Independent management of sets
- Ideal for organizations without Active Directory
Cons:
- Increased complexity in synchronization
- More effort required for agent deployment
- Higher administrative overhead
The following diagrams are the representation of the same organization in two different architectures:
4. Configure Policies
Understanding Advanced Policies vs Trust Policies
Trust Policies can be of different types, for Windows: Installation package, Network share, Software distributor, Software updater, User, URL, Publisher's signature, Product Name, and for MacOS: Publisher's signature, Software Distributor, with different types of action: allow or elevate if necessary.
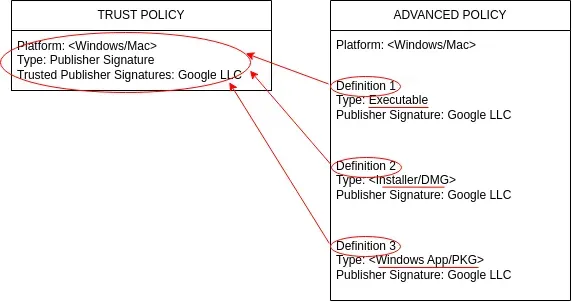
On one hand, Trust Policies are usually used to cover all applications from a Software Vendor (Microsoft, Google, etc) no matter the file type (executable, installer, DMG, etc) and are applied to all the computers within the set (no selection is possible) with the lowest priority.
On the other hand, Advanced Policies are usually used when more granularity is desired, they include definitions and application groups to allow, block or elevate applications with different types (executable, installer, PKG, DMG, DLL, etc) and properties (filename, location, publisher's signature, checksum, bundle ID, version, etc). Advanced Policies can target specifc users, user groups, or computer groups with exclusions. Advanced Policies can be moved around by priority.
Both types can achieve the same objective, however Advanced Policies have more granularity in terms of: priority, target, and application types.
The following diagram represents a trust policy and an advanced policy with the same behavior:
Understanding Definitions and Application Groups
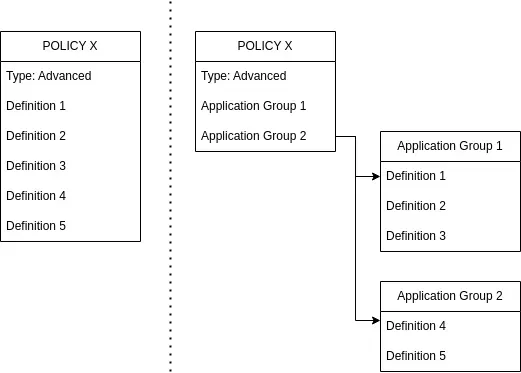
Advanced Policies can use both definitions or application groups, application groups are optional. Applications Groups allow an easier management of definitions and can be re-used in different policies instead duplicating and editing existing policies.
The following diagram represents the same policy with two different constructions:
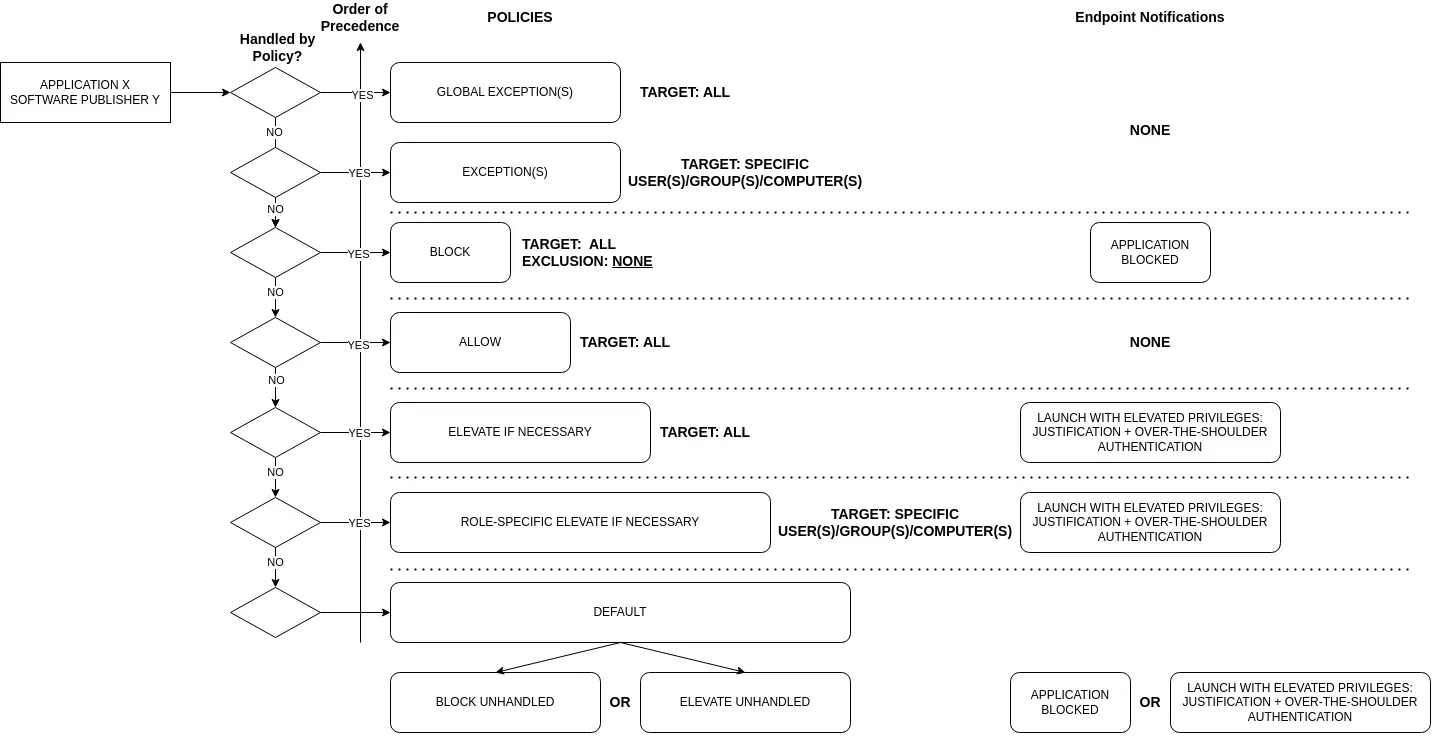
Recommended Architecture
Best Practices for Exceptions
- Highest Priority Exceptions: Individual exceptions should have the highest priority. These exceptions allow specific software for specific users/groups/computers that would otherwise be blocked on all endpoints.
- Avoid Exclusions in Block Policies: Do not add exclusions to block policies as they contain multiple definitions. Instead, create specific exceptions.
Day-to-Day Operations
As you monitor unhandled applications in your event management or via Application Catalog > Application Coverage by Policies, filter by Coverage Status "Unhandled". Add these applications as definitions in application groups for either the Block policy, the Allow policy or the Elevate if Necessary policy.
- Elevate if Necessary Policy: For software publishers whose applications may require elevated privileges for updates, add them to the Elevate if Necessary policy. This ensures users can update the application.
- Allow Policy: Add applications to the Allow policy when they are incompatible with the Elevate if Necessary policy, such as DMGs, Windows Apps, and DLLs.
Specific Considerations for macOS
On macOS, the Elevate policy functions similarly to Elevate if Necessary on Windows.
This is due to the fact that on MacOS we are talking about authorization.
Indeed, applications on MacOS can be run by both standard users and administrators. However, certain actions within those applications may require additional authorization. This is typically managed through prompts that request an administrator's password when necessary.
Running applications with elevated privileges directly is less common and usually managed via the command line with sudo.
Therefore, while you can run the same application as either a standard user or an administrator, specific elevated actions within that application will prompt for the appropriate authorization.
Default Policy Recommendations
Depending on your set of computers and the desired level of restriction, you may want to set the default policy to Block or Elevate Unhandled with additional security, such as justification and over-the-shoulder authentication (password or step-up authentication).
- Developers: For developers who frequently use unsigned programs, setting the default policy to Elevate with justification and authentication can simplify management.
- Non-Technical Users: For non-technical users, defaulting to Block is advisable since there’s no need for them to run unsigned programs.
This approach balances security and usability, ensuring that necessary applications can run while maintaining stringent controls where appropriate.
I strongly recommend the following architecture for simplicity and best practice:
5. Agent Configuration
Configure Third-party Exclusions
The CyberArk EPM agent can conflict with third-party security applications such as EDRs on endpoints. This is why CyberArk recommends excluding third-party security programs from the checks performed by the EPM agents.
Windows
CyberArk files and drivers:
%ProgramFiles%\CyberArk\Endpoint Privilege Manager\Agent\
%SystemRoot%\System32\drivers directory during installation.
C:\Windows\System32\drivers\vfdrv.sys
C:\Windows\System32\drivers\vfnet.sys
C:\Windows\System32\drivers\vfpd.sys
C:\Windows\System32\drivers\CybKernelTracker.sys
Other security software:
%Program Files%\McAfee\VirusScan Enterprise\
%Program Files%\ESET\
%Program Files%\Kaspersky Lab\
%Program Files%\SentinelOne\
%Program Files%\CrowdStrike\
...
MacOS
CyberArk files:
/Applications/CyberArk EPM.app
/Library/Application Support/CyberArk
/Library/Keychains/CyberArkEPM.keychain
/Library/SystemExtensions/*/com.cyberark.CyberArkEPMEndpointSecurityExtension.systemextension
/Library/LaunchDaemons/com.cyberark.CyberArkEPMWebServiceSession.plist
/Library/LaunchAgents/com.cyberark.CyberArkEPMUIAgent.plist
/Library/LaunchAgents/com.cyberark.CyberArkEPM.plist
/Library/LaunchDaemons/com.cyberark.CyberArkEPMPrivilegedHelper.plist
/Library/PrivilegedHelperTools/com.cyberark.CyberArkEPMPrivilegedHelper
Other security software:
/Applications/SentinelOne/
/Library/Sentinel/sentinel-agent.bundle/
/Applcations/Falcon.app/
...
Custom Identity Provider with Step Up Authentication
The over-the-shoulder authentication allows you to force users to provide additional credentials before they can launch applications or run applications with elevated privileges. This can be done using local user credentials or using the step up authentication with any identity provider that supports the OpenID Connect protocol. Endpoint users can specify these credentials in the Application Launch Alert, Elevate, and Elevate Trusted dialogs that are configured for policies with Elevate and Elevate if necessary actions.
| Parameter | Description |
|---|---|
| Set the configuration for the identity provider that supports OpenID Connect protocol | Enable the toggle button. |
| Identity provider name | The name of the identity provider. For example, CyberArk Identity. |
| Client ID | The client ID provided by your identity provider. |
| User domain | The user domain for the identity provider connection. |
| OpenID Configuration URL | The URL that returns the OpenID Connect configuration values. |
| Redirect URI | The redirect URI for the identity provider. This value cannot be changed in EPM. |
In conclusion, CyberArk EPM can be difficult to get to grips with at first, but once you've got used to it, you'll quickly understand the mechanism and it'll be easy to configure anything within the interface. Most of the work lies in configuring policies at first, with very long lists of software publishers to block or allow depending on the application landscape and the amount of shadow IT present in your organization. However, once this is done and you reach a satisfactory level of coverage, for example >90% of applications handled by policies, it becomes easy in day-to-day operations to add applications that appear in the event management flow to existing application groups in block or allow policies.
Member discussion